Quick start
This checklist takes you from a saved SketchUp Free model to a reviewed workshop plan. SketchUp Free cannot install cut-list extensions, so SawWise works separately: you save the .skp file and import it here. For a first trial, use a small project with simple rectangular parts so it is easy to compare SawWise with the model.
Using paid SketchUp? OpenCutList is likely a better fit. SawWise is designed primarily to fill the extension gap in SketchUp Free.
1. Prepare the model
Make each physical piece a SketchUp group or component. A table leg, rail, shelf, side panel, and back panel should normally be separate pieces. Use repeated component instances for identical pieces instead of drawing copies as loose geometry.
Give parts useful names such as Side panel, Front rail, or Leg. Material names can provide useful clues, but they do not replace review. In SketchUp Free, use Save as or download the model as a .skp file before opening SawWise.
Your model is ready when:
- Every piece you want on the cut list is a group or component.
- Repeated quantities match the number of placed instances.
- Finished rectangular dimensions are correct.
- Any reference or decorative objects are easy to recognise later.
- Loose faces and edges are grouped if they represent real pieces.
2. Import the file
Drop the .skp file onto Drop a SketchUp file here, or choose it from your computer. SawWise reads and plans the model in your browser.
If import fails, confirm that it is a .skp file, reopen it in SketchUp, save it again, and retry. Some unusual model structures may not be supported.
Tip: SawWise does not keep the open model after a refresh, so just import the
.skpagain.
3. Review the parts
Start in Overview. Have a look at Needs review, Unknowns and warnings, and any loose drawing geometry, then open Parts.
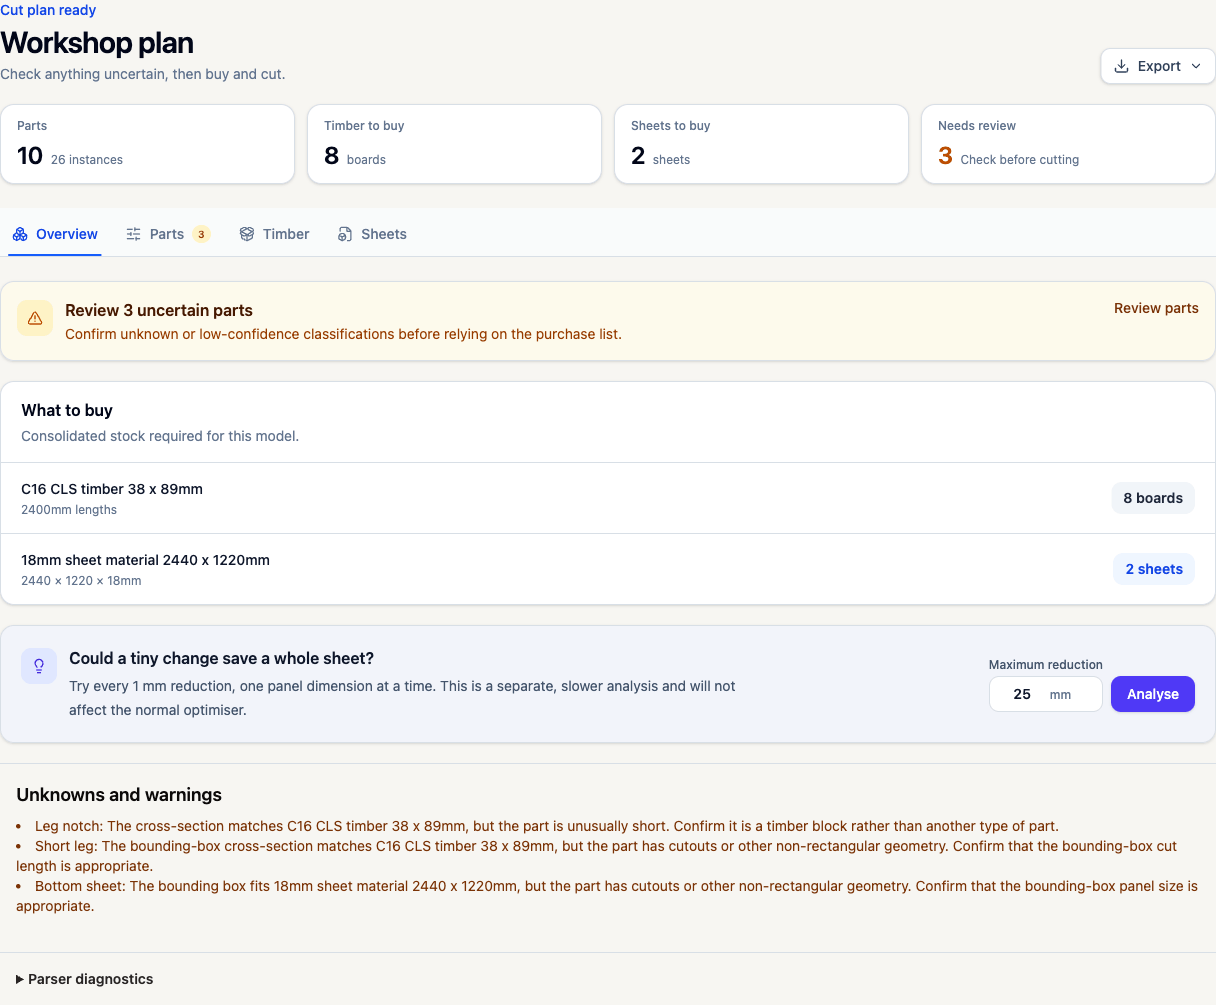
The Overview brings purchase quantities and unresolved checks together before you open the detailed plans.
- Compare each part name, quantity, and dimensions with SketchUp.
- Check rows marked Review, Weak match, or Unclassified.
- Confirm whether each part is timber or sheet stock.
- Choose the intended sheet material for each thickness under Sheet materials for this project.
- Correct names, quantities, stock assignments, or cut dimensions where needed.
- Use Keep panel orientation when rotation would conflict with grain, face direction, or your intended layout.
- Use Exclude from cut list for reference objects and anything else you are not making.
Confirming a choice tells SawWise to use it in the plan.
4. Set up stock and kerf
Open Settings and check Stock and cutting setup. Select built-in stock only when its physical dimensions match what you can buy. Otherwise add your own timber or sheet entry.
Check Timber blade kerf and Sheet blade kerf separately. Kerf is the width removed by the blade. Use a measured value for the blade and setup you will actually use.
For timber, confirm the cross-section and available purchase lengths. For sheets, confirm material, thickness, length, and width. These settings apply across projects in this browser.
5. Check what to buy
Return to Overview and read What to buy. Timber can be listed in mixed lengths. Sheets to buy excludes compatible panel offcuts allocated from Offcut inventory.
If SawWise says No new stock is required and that seems surprising, check for unclassified, excluded, or zero-quantity parts. Your offcuts or completed inventory panels may be covering everything, which is always a nice result. The shopping-list guide covers the less common causes too.
Compare the listed sizes with what your supplier sells and adjust the stock setup if needed.
6. Review the cutting plans
In Timber, compare the board table and scaled diagrams. Choose the timber plan style that suits your work, then inspect every board allocation and kerf.
In Sheets, check the selected Sheet size to buy, panel list, unplaced warnings, 2D layout, and numbered cut sequence. A guillotine cut runs edge-to-edge across the current rectangular workpiece, which may be a smaller piece created by an earlier cut.
7. Print or export
Use Export for JSON data, CSV spreadsheet, Markdown report, or Print cut sheets. Printing opens the browser print flow; choose Save as PDF there if your browser and operating system provide it. SawWise does not generate a native PDF file.
What is stored locally?
SawWise stores stock settings, units, part choices, sheet preferences, and offcut inventory in your browser. It can reuse those choices when it recognises a project, but you will need to import the .skp again after a refresh.
Tip: After changing the SketchUp model, import the latest file and have another quick look through your manual choices.